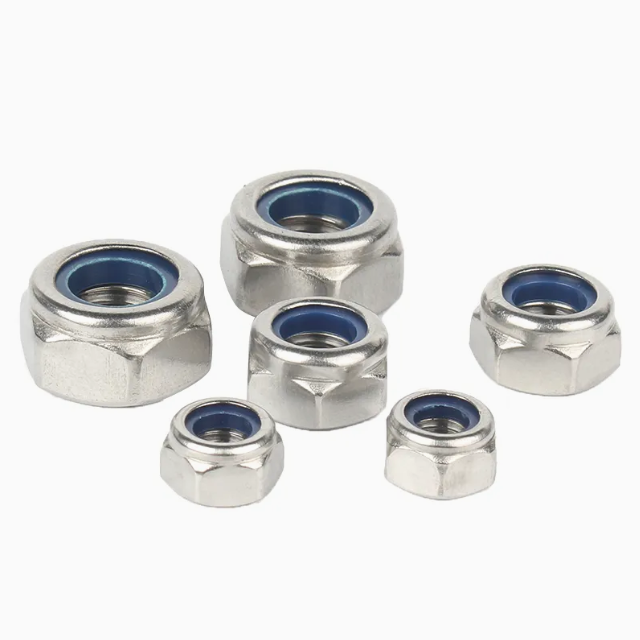
Getting a fastener assembly right represents a critical mechanical compliance issue. It is not merely a weekend DIY task. Incorrect installation can easily lead to severe vibration loosening. This failure causes sudden equipment downtime and introduces massive safety hazards. Many technicians face a common question during assembly. They often ask which way does a lock nut go on to guarantee maximum security.
While the question might seem overly simple, the correct answer varies. It depends heavily on the specific style of the fastening component you use. A nylon ring fastener behaves entirely differently than an all-metal stover nut or a double-nut configuration. You must understand these variations to avoid catastrophic joint failure.
This article provides a definitive guide on proper installation techniques. We will explore the underlying mechanical principles governing these fasteners. You will learn specific orientation rules and analyze common failure risks. We also outline clear criteria for evaluating modern fastening solutions to ensure long-term joint integrity.
Key Takeaways
The Quick Answer: For a standard nylon insert lock nut, the metal base threads onto the bolt first; the nylon ring faces outward.
Mechanical Requirement: The bolt end must fully pass through the nylon insert to properly engage the locking mechanism.
Reusability Warning: Nylon insert lock nuts are generally single-use; reusing them drastically degrades their holding power and compromises assembly reliability.
Application Limits: Nylon inserts fail at high temperatures (typically above 250°F/121°C), requiring all-metal alternatives for extreme environments.
The Definitive Answer: Which Way Does a Lock Nut Go On?
Installation direction matters significantly for joint stability. You must position the fastener correctly to distribute the load. The flat, all-metal side always acts as the load-bearing face. You thread this side onto the fastener first. It must sit completely flush against the washer. If you do not use a washer, it must sit flush against the mating surface.
Understanding proper nylon insert orientation ensures the locking mechanism activates correctly. Look closely at the component. You will notice one side features a visible nylon ring. Manufacturers often color this ring blue or white. Some designs also feature a slightly rounded or domed top. This side must face outward. It should point away from the material you are fastening.
Placing the flat side down ensures optimal surface contact. Proper surface contact creates friction against the base material. This friction prevents the entire assembly from spinning during the final tightening phase. It also protects the structural integrity of your base components.
Thread engagement rules dictate the final security of the joint. The component cannot function securely if the threads do not pass completely through the collar. You must ensure a minimum of two to three full threads of the bolt end protrude past the nylon ring. This protrusion confirms the nylon material has fully engaged the external threads. If the threads remain hidden inside the collar, the joint remains dangerously unsecured.
The Mechanics: How a Nylon Insert Lock Nut Prevents Failure
These fasteners rely on continuous friction to prevent loosening. We call this a prevailing torque mechanism. The nylon insert has a slightly smaller inner diameter than the external threads of the mating fastener. This size difference is intentional and crucial for the locking action.
A specific deformation process occurs during tightening. As the fastener passes through the collar, it forces its way into the plastic material. The metal threads actually cut their own path into the nylon ring. This action compresses the nylon. The compressed material immediately tries to return to its original shape due to elastic memory. This elasticity creates high radial friction. The friction tightly grips the threads and violently resists vibrational loosening.
Orientation directly dictates the success of this mechanical process. Installing a nylon insert lock nut backward creates immediate assembly hazards. The external threads will hit the tight nylon restriction before they properly align with the metal threads. This premature restriction drastically increases the risk of cross-threading.
Cross-threading damages the metal threads permanently. It also creates false torque readings on your wrench. Your tools will indicate the joint is tight. However, the tension comes from the jammed nylon, not the clamped materials. The joint will eventually fail under normal operating loads.
Solution Categories: Orientation Rules for Other Lock Nut Variants
Engineers specify different fastener styles for different environments. Each style features unique installation rules. You must identify the component type correctly before beginning assembly.
All-Metal Lock Nuts (Stover/Toplock)
These components lack a visible plastic ring. You use them primarily in high-heat or high-stress environments.
Identification: They feature a distinctly conical or chamfered top. The top threads are intentionally distorted during manufacturing.
Orientation: The flat, undistorted side faces the material. You thread this side on first. The deformed, conical side always faces outward. Driving the fastener through the distorted threads creates the locking friction.
Flange Lock Nuts (Serrated & Non-Serrated)
These units eliminate the need for a separate washer. They handle wide load distributions effectively.
Identification: They possess an integrated washer base. This base is significantly wider than the top of the fastener. Some versions feature serrations on the bottom.
Orientation: The wider flanged base must sit completely flush against the mating surface. The serrations bite into the base material to prevent backward rotation.
The Double-Nut (Jam Nut) Configuration
Heavy machinery applications often require a two-nut system. This configuration confuses many mechanics due to its counterintuitive engineering standard.
You thread the thin nut onto the fastener first. Tighten it to approximately 25% to 50% of the final torque specification.
You thread the standard thick nut on second.
You hold the thin nut securely with a wrench.
You tighten the thick nut fully against the thin nut.
This process unloads the threads of the thin nut. It forces the two components to push against each other. Referencing Bolt Science principles, this counter-rotation locks the assembly far more effectively than placing the thick nut first.
Implementation Risks: Costly Mistakes in Lock Nut Assembly
Improper assembly protocols destroy joint integrity. Even seasoned technicians make costly mistakes when handling these specialized components. You must recognize these implementation risks to maintain safety standards.
The reusability fallacy represents the most common assembly error. Mechanics often remove a used fastener and reinstall it to save time. You must avoid this practice. The cutting action permanently deforms the plastic collar. Reusing the component drastically degrades its locking torque. Industry structural compliance standards strictly void assemblies that reuse plastic collar fasteners. Treat them strictly as single-use items.
Torque specification errors also plague assembly lines. Standard torque charts assume free-spinning threads. However, the plastic collar adds significant prevailing torque. You feel this resistance before the fastener even touches the base material. Assembly teams must adjust torque wrench calculations to account for this added friction. Failing to adjust calculations leaves the actual joint under-tightened.
Thermal and chemical failures destroy the locking mechanism completely. You must respect the environmental limits of the materials you use. Placing standard plastic inserts in automotive engine bays causes the collar to melt. Using them in heavy chemical washdown areas degrades the polymer. Once the plastic degrades, you completely lose the vibration-resistant feature.
Systematic Prevention Strategies
Assembly Mistake
Mechanical Impact
Prevention Strategy
Reusing components
Loss of radial friction; vibration loosening.
Enforce strict single-use replacement protocols.
Ignoring prevailing torque
Under-tightened joint; false security.
Add prevailing resistance to final torque calculations.
High-heat exposure
Melted collar; total loss of locking action.
Switch to Grade C all-metal stover configurations.
Selecting the correct fastening solution requires a systematic evaluation. You must analyze your specific operational environment. Different parameters dictate entirely different hardware choices.
Temperature limits dictate your baseline material choices. Standard plastic collars fail near 250°F (121°C). They become soft and lose their elastic memory. For elevated temperatures, you must contrast these limits with Grade C all-metal alternatives. All-metal components withstand extreme heat easily. They also resist aggressive industrial chemicals that would otherwise dissolve polymer inserts.
Vibration severity forces you to evaluate advanced locking technologies. A standard plastic collar handles moderate vibration well. However, aerospace applications and heavy rock-crushing machinery generate extreme dynamic loads. In these scenarios, you must step up from a standard fastener to a wedge-locking washer system. Brands like Nord-Lock use tension rather than friction to secure the joint. Alternatively, you might specify safety wire protocols for absolute physical retention.
Scalability heavily influences high-volume manufacturing environments. You must balance assembly speed against unit pricing. Plastic collar fasteners offer an excellent balance for general manufacturing. They install quickly and require minimal specialized tooling. All-metal components cost slightly more and demand higher installation torque. Chemical threadlockers, such as Loctite, present another alternative. However, liquid threadlockers require precise application, introduce curing times, and complicate maintenance disassembly. You must weigh these production bottlenecks against your operational requirements.
Conclusion
Proper fastener orientation guarantees the mechanical integrity of your assemblies. Always ensure the flat metal side threads on first. The load-bearing face must sit flush against your materials. Verify the nylon ring faces outward. Most importantly, ensure adequate protrusion so the external threads fully engage the locking collar.
Implementing best practices prevents costly failures. Prioritize correct torque specifications that account for prevailing friction. Enforce strict single-use replacement protocols across your maintenance teams. Discard deformed fasteners immediately.
Take action before your next assembly project. Consult your internal engineering specifications. Review the thermal and chemical limits of your chosen materials. If you operate in extreme environments, contact a specialized hardware supplier. They can guide your bulk sourcing for critical-application components.
FAQ
Q: Can you put a lock nut on backward?
A: Yes, it is physically possible to thread it backward, but it causes severe mechanical consequences. The threads hit the tight locking collar before aligning with the metal threads. This misalignment heavily increases the risk of cross-threading and results in a total loss of holding power.
Q: Do you need a washer with a lock nut?
A: Yes, you generally need a washer. Washers distribute the physical load evenly across the mating surface. They also prevent the turning hardware from digging into and permanently damaging the softer base material during the final tightening phase.
Q: Should you use Loctite with a nylon insert lock nut?
A: No, you should avoid using chemical threadlockers with these fasteners. The chemicals in liquid threadlockers can chemically degrade and weaken the plastic collar. The mechanical friction of the collar already prevents loosening, making liquid threadlockers completely redundant.
Q: How many threads should stick out of a lock nut?
A: The recognized industry standard requires two to three full threads to protrude past the locking collar. This protrusion guarantees the external threads have completely engaged the friction mechanism, ensuring maximum joint security.